Running PyTorch on Apple Silicon: Enabling M1 GPU Training

1 Introduction
On May 18, 2022, PyTorch announced on its official blog that, starting with PyTorch 1.12, you could train models directly on the GPU built into Apple Silicon. In other words, if your MacBook Air or MacBook Pro runs an M1 chip instead of an Intel chip, a neural network you build with PyTorch can finally get GPU acceleration — until then, TensorFlow was the only framework that could do this on a Mac.
This post walks through the whole process: checking your macOS version, installing Miniconda, creating a virtual environment, installing an M1-GPU-enabled build of PyTorch, and finally measuring the actual training-time difference between M1 CPU and M1 GPU on a simple classification task.
(This post was originally written while M1 GPU support was still a nightly-build-only feature, so the installation below uses the nightly build; that support has since shipped in the stable PyTorch 1.12 release.)
2 Checking Your macOS Version
Before installing PyTorch, confirm your macOS version is 12.3 or later. This isn’t an arbitrary requirement — the GPU acceleration in newer PyTorch builds runs on Apple’s Metal Performance Shaders (MPS), and the complete MPS backend requires macOS 12.3 or newer.
Open Terminal and run the following command to check your macOS version:
sw_vers3 Installing Miniconda
When developing Python projects, different projects often need different package versions. The better approach is to create a separate virtual environment for each project, so packages from one project don’t interfere with another.
There are many tools for managing Python packages; here we’ll use Anaconda. However, Anaconda bundles a lot of tools you may never use, so we’ll install the lightweight version instead — Miniconda.
Miniconda supports many operating systems, so make sure to grab the build for M1, i.e. Miniconda3 macOS Apple M1 ARM 64-bit bash. The catch here is not to accidentally download the x86 build — if you do, your entire environment will run under Rosetta translation, taking a real performance hit.
Once the download finishes, open Terminal and locate the installer script:
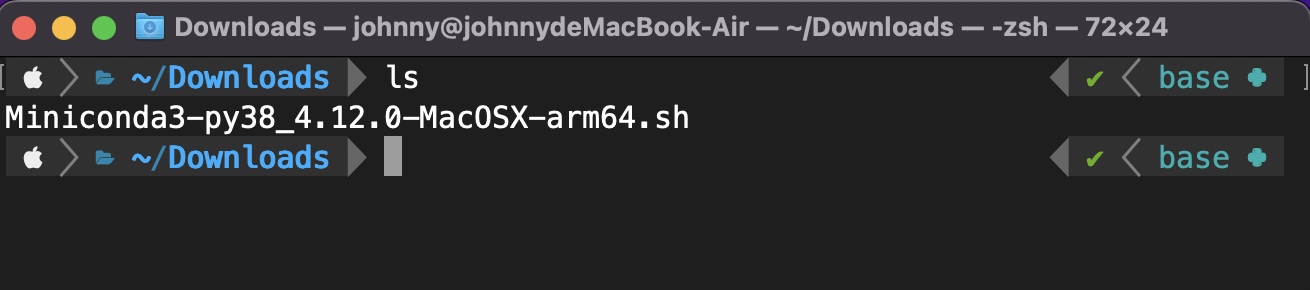
Make the file executable with chmod:
sudo chmod +x Miniconda3-py38_4.12.0-MacOSX-arm64.shThen run the script:
./Miniconda3-py38_4.12.0-MacOSX-arm64.shFollow the on-screen prompts to finish installing Miniconda.
4 Creating a PyTorch Virtual Environment
Open Terminal again and create a virtual environment named “pytorch-m1”, specifying Python 3.8:
conda create --name pytorch-m1 python=3.8Then activate the environment:
conda activate pytorch-m1Install the required packages via pip:
pip3 install --pre torch torchvision --extra-index-url https://download.pytorch.org/whl/nightly/cpuWait about a minute for the packages to finish installing, and you’re done!
5 Using the M1 GPU in PyTorch
In the past, using an Nvidia GPU in PyTorch meant specifying the device like this:
device = torch.device("cuda")To use the M1 GPU instead, simply swap cuda for mps — everything else stays exactly the same, still moving both tensors and the model to the device with .to(device):
device = torch.device("mps")In other words, an existing CUDA training script usually needs to change only this one line to run on a Mac.
6 M1 CPU vs. M1 GPU (1)
Next, I used a simple classification task — MNIST digit classification — to compare training time between the M1 CPU and M1 GPU on a MacBook Air 2020.
I used the code provided by pytorch/examples on GitHub, training the same model on CPU and GPU respectively. Both runs used 5 epochs and a batch size of 64 — the only variable was the device.
The chart below shows the time difference between the two:
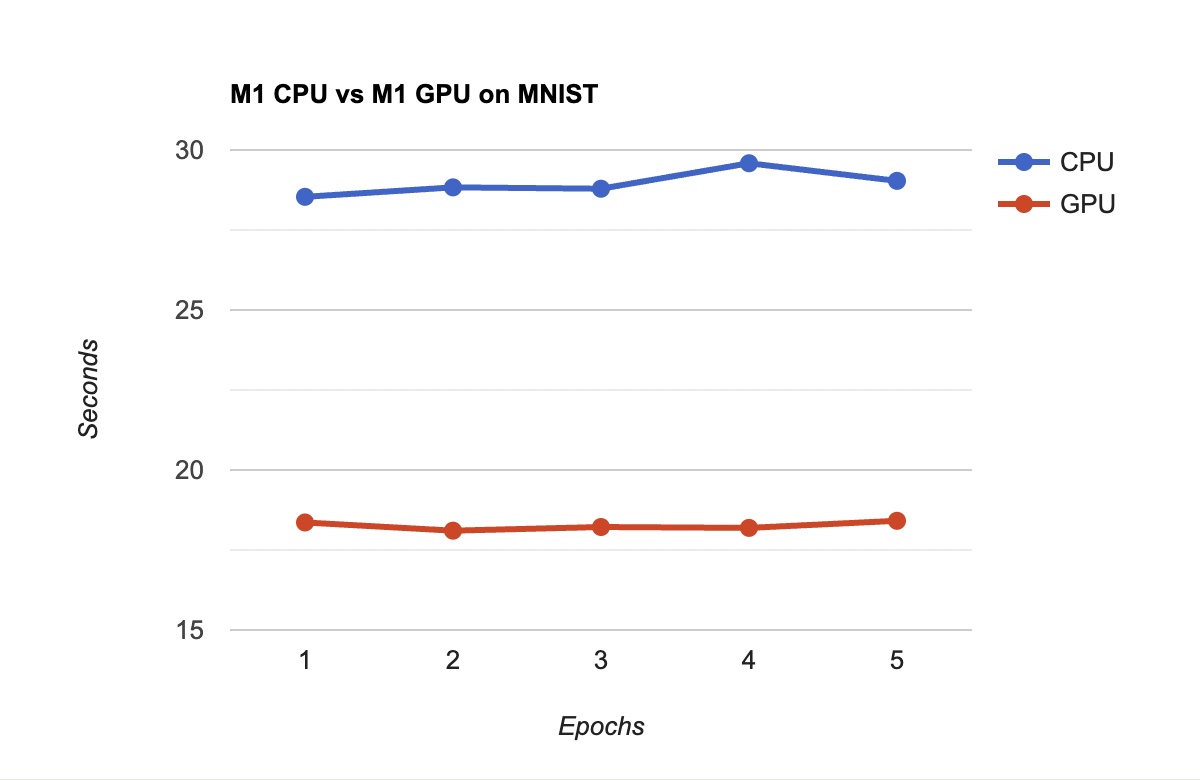
Each epoch took about 28.96 seconds on the M1 CPU and about 18.26 seconds on the M1 GPU — a 36.95% reduction in training time.
7 M1 CPU vs. M1 GPU (2)
The test above used a very small model and dataset, so its reference value is limited. sebastianraschka ran a larger-scale comparison on his blog: training VGG16 on the CIFAR-10 dataset, benchmarked across multiple hardware devices.
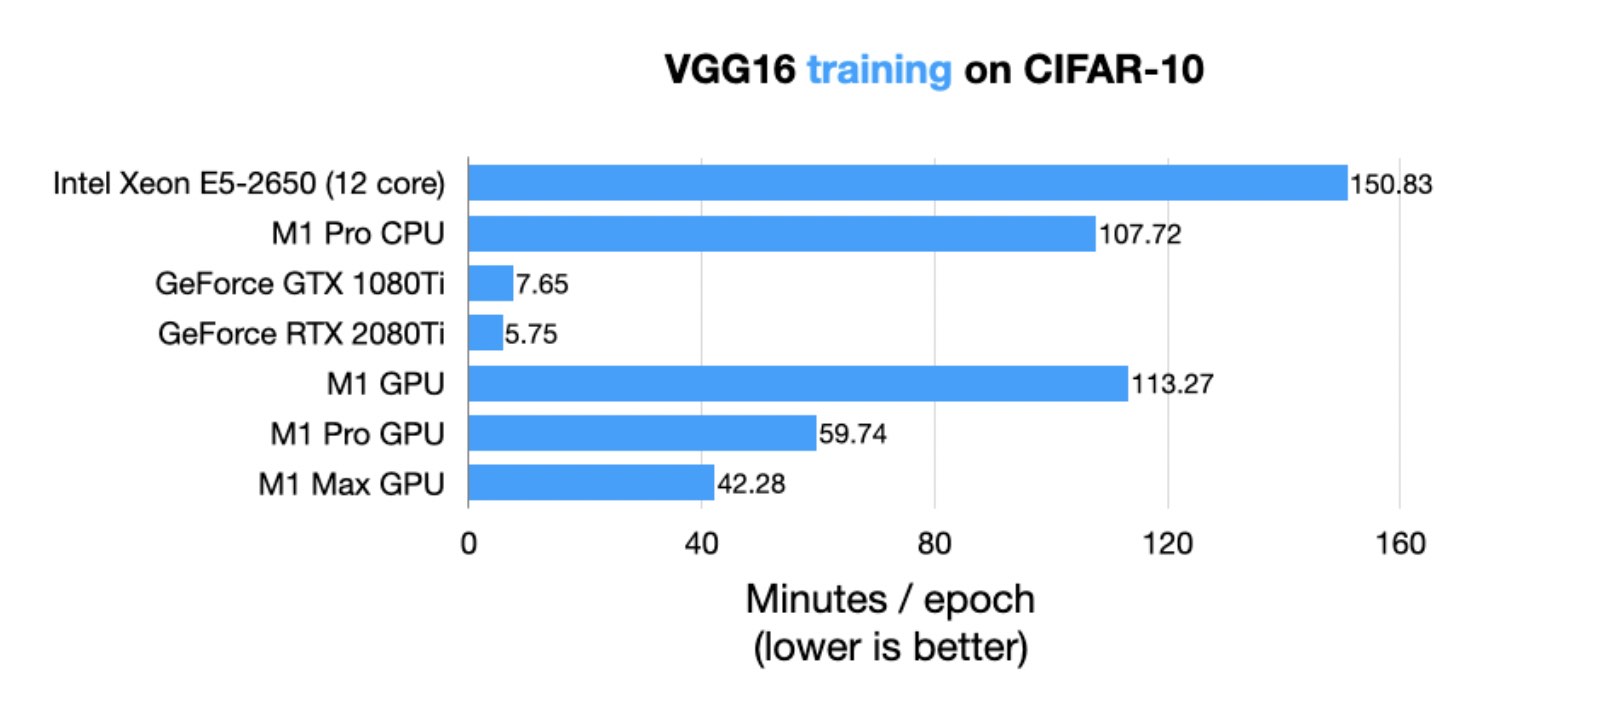
Comparing just the M1 Pro CPU and M1 Pro GPU, the GPU cuts training time by 44.54% — the larger the model, the bigger the gap the GPU opens up.
8 Conclusion
This post covered how to enable the M1 GPU in PyTorch — the key installation requirement is macOS 12.3 or later plus an arm64 environment, and the only code change needed is swapping the device from cuda to mps. On the performance side, this saved roughly 37% of training time on MNIST and roughly 44% on VGG16 with CIFAR-10.
That said, even with M1 GPU support, using a laptop (MacBook Air or MacBook Pro) as your primary device for training neural networks still isn’t very practical. Training large networks routinely takes hours, and running a laptop under sustained full load for that long isn’t kind to its lifespan. It’s better suited to local debugging and small experiments. Once you’ve got GPU support working, a natural next step is putting it to use on a real model — for example, training a ResNet image classifier with PyTorch.