Secure Your Lightsail WordPress Site: A Step-by-Step Guide to Free SSL with Let's Encrypt
1 Introduction
This is the fourth article in our Lightsail x WordPress series. In the first three articles, we covered how to create a WordPress website using AWS Lightsail, assign a custom domain to the site, and finally, how to back up and restore the website. In today’s article, we will learn how to use the Let’s Encrypt service to issue an SSL certificate for our site, enabling us to use the HTTPS protocol.
This tutorial is for you if you can successfully access your website by typing its domain into the browser, but the URL still shows as “http://your-domain.com”. Additionally, you must be able to connect to your server via SSH and have sudo privileges to install packages. We are using Nginx as our web server.
2 Install Certbot for Nginx on Ubuntu
First, let’s install Certbot for Nginx on Ubuntu. We’ll use Certbot to configure the SSL certificate for our website.
sudo add-apt-repository ppa:certbot/certbot
sudo apt install python3-certbot-nginx
3 Ensure the Firewall Allows HTTPS Traffic
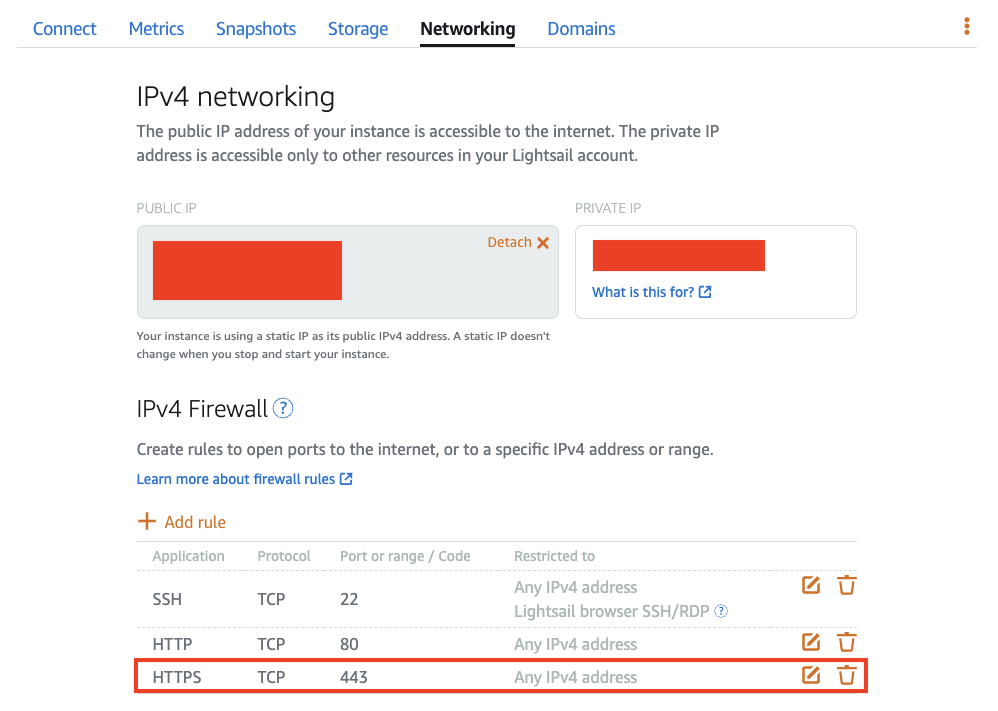
Here, you need to make sure that both Ubuntu’s firewall and Lightsail’s firewall allow HTTPS traffic. This is necessary for users to access your site via the HTTPS protocol. On Ubuntu, check your current firewall settings:
sudo ufw statusEnsure that HTTPS traffic is allowed. If not, you can add a new rule:
sudo ufw allow 'Nginx Full'In Lightsail, add an HTTPS rule in your instance’s “Networking” settings (you can add one for IPv6 as well):
4 Configure the Domain in Nginx
Use the Nano editor to open the Nginx configuration file for your WordPress site:
sudo nano /etc/nginx/sites-available/wordpressThen, add your domain to the server_name directive (the rest of the content should already be there from the previous setup):
server {
        listen 80;
        root /var/www/wordpress;
        index index.php index.html index.htm index.nginx-debian.html;
        server_name your-domain.com;

        location / {
                try_files $uri $uri/ /index.php$is_args$args;
        }
        location = /favicon.ico { log_not_found off; access_log off; }
        location = /robots.txt { log_not_found off; access_log off; allow all; }
        location ~* \.(css|gif|ico|jpeg|jpg|js|png)$ {
                 expires max;
                 log_not_found off;
        }
        location ~ \.php$ {
                include snippets/fastcgi-php.conf;
                fastcgi_pass unix:/var/run/php/php8.1-fpm.sock;
        }

        location ~ /\.ht {
                deny all;
        }
}
5 Set Up the SSL Certificate with Certbot
Run the following command to obtain the SSL certificate using Certbot (remember to replace myexampleblog.com with your own domain):
sudo certbot --nginx -d myexampleblog.comIf you see a “Congratulations!” message, it means the setup was successful! Next, we want to ensure the SSL certificate renews automatically. Let’s test the renewal process:
sudo certbot renew --dry-runAgain, if you see a “Congratulations!” message, you’re all set! If you’ve reached this point, your website is now configured with an SSL certificate, and users can communicate with your server over the HTTPS protocol.
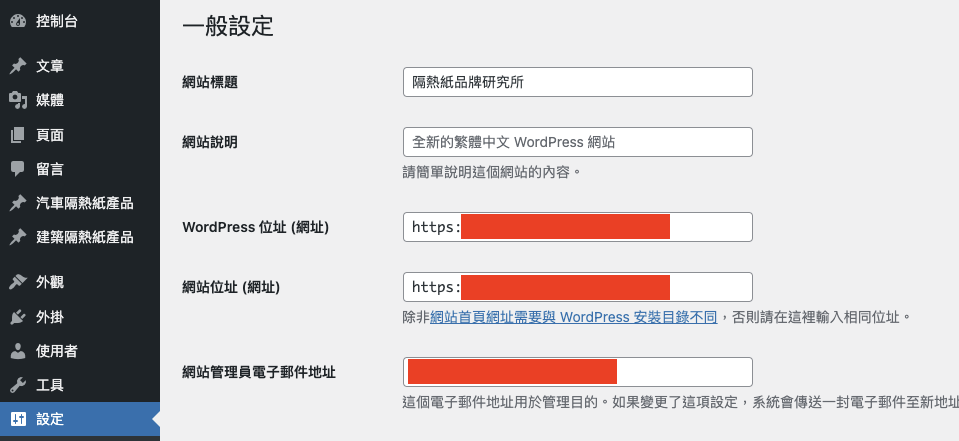
6 Change the Site Address to HTTPS in the WordPress Dashboard
However, if you try to visit “https://your-domain.com” in your browser, you might find that you can’t access your site. This is because in the WordPress settings, the “WordPress Address (URL)” and “Site Address (URL)” are still set to “http://your-domain.com”. We need to update this in the WordPress dashboard.
But when you try to log in to your WordPress admin area (http://your-domain.com/wp-admin), you’ll discover that you can’t get in!
Don’t panic. This happens because in the previous step, Certbot added settings to your Nginx WordPress configuration file (/etc/nginx/sites-available/wordpress) that force an automatic redirect from HTTP to HTTPS. Since the WordPress settings haven’t been updated yet, we can’t access the site properly via HTTPS, causing a login issue.
There are two ways to solve this:
The first method is to go directly into MySQL and change the home and site_url values in the WordPress database from “http://your-domain.com” to “https://your-domain.com”. (You can refer to the restoration section of the WordPress Backup and Restore article for guidance.)
The second method is to temporarily comment out the HTTPS-related settings in the Nginx configuration file. This will allow you to access the WordPress dashboard via HTTP. Once inside, change the “WordPress Address (URL)” and “Site Address (URL)” from “http://your-domain.com” to “https://your-domain.com”. Then, go back to the Nginx configuration file and uncomment the lines you previously commented out.
7 Conclusion
When you visit a website and your browser warns you of an “HTTP Not Secure connection,” doesn’t it make you feel uneasy? You probably want to leave that site immediately. Therefore, setting up an SSL certificate for your website is crucial to allow users to browse via HTTPS. In this article, we’ve shown you how to obtain an SSL certificate in 5 simple steps, switching your site’s traffic from HTTP to HTTPS.