Your First Python Program: input( ) and print( )


1 Introduction
This is the fourth article in the Python programming beginner’s series. The previous one, “Variables and Data Types in Python”, introduced the concept of variables and the basic data types — both of which are foundations common to almost every programming language. If you don’t have a feel for them yet, it’s worth finishing that article before coming back here.
What this article does is simple: take the pieces we’ve learned so far, assemble them into the first Python program that actually runs and talks to a person, then pull it apart line by line to see what it really does.
2 What the First Python Program Does
The goal for our first complete program is “interactivity”. Interactive means the program is no longer talking to itself, printing fixed content — it can take data the user gives it, compute something, and feed the result back.
Concretely, we want the user to type some text or numbers on the keyboard, have the program do some processing with that input, and finally display the result on the screen.
3 A Computer’s Input and Output Devices
You might wonder why we’re making a point of “keyboard input” and “screen output”. It’s because the keyboard isn’t the only input device attached to a computer, and the screen certainly isn’t the only output device.
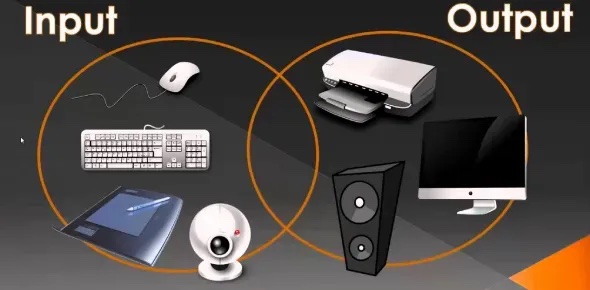
As the figure shows, input devices also include the “mouse”, “keyboard” and “camera”; output devices include the “printer”, “screen” and “speakers”. When writing a program, we’re free to decide which input device’s information to read, and which output device to send the result to. The program in this article uses the simplest pair of all: in through the keyboard, out to the screen.
4 Writing the Code
Once the input and output devices make sense, we can start writing. Open Colab first (if you aren’t comfortable with Colab yet, read “Google Colaboratory” first), then type the code in the figure below out exactly, character for character, and run it.
The reason it’s an image rather than a copyable code block is precisely so you can’t copy it. When learning to program for the first time, typing every character yourself makes you improve much faster.
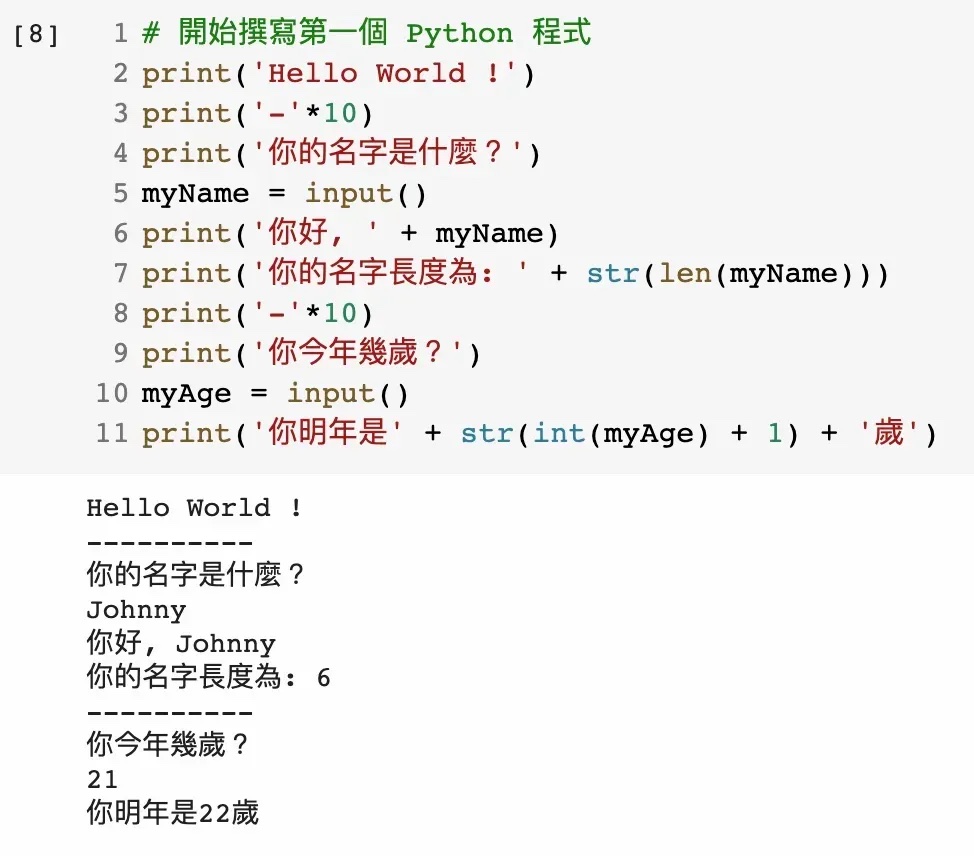
Running this code gives you two opportunities to “input” something, and once it finishes you should get a result similar to the one shown (in black) below the code.
5 Understanding the Code
Don’t worry if the code above doesn’t make sense yet — we’ll take it apart line by line. You’re also welcome to leave questions on the YT channel.
- Line 1: anything starting with “#” is treated as a “comment” in Python and is ignored outright when the program runs. Comments exist to explain what the code is doing, which makes coming back to it later far easier.
- Line 2: uses the print( ) function to display a string on the screen. The full concept of a “function” comes in a later article; for now all you need to know is that when calling (using) print( ), you put the string you want displayed inside print( )’s parentheses. Put the string ‘Hello World !’ in there, run it, and the screen shows “Hello World !”. Something passed into a function like this is called an “argument”.
- Lines 3-4: like line 2, these use print( ) to put a string on the screen. The difference is that line 3’s argument uses the string replication trick — repeating the same string end to end, so that ‘ab’ * 3 gives ‘ababab’ — which is often used to draw a separator line.
- Line 5: uses the input( ) function to receive data typed by the user. When input( ) runs in Colab, an input box appears on screen and waits for the user to type; pressing Enter completes the input, and Python packages what was typed into a single string stored in the variable (myName).
- Line 6: again uses print( ) to put a string on the screen, but this time several strings are first joined into one with string concatenation and then passed in as the argument — for example ‘Hello, ’ + ‘Tom’ gives ‘Hello, Tom’. Note carefully: whether you use string replication or string concatenation, the argument that ends up going into print( ) is always just one string.
- Line 7: uses the len( ) function to compute a string’s length. Pass a string into len( ) and it returns that string’s length. Because len( ) returns an int type, which can’t be added to a string directly, we then use the str( ) function to convert the integer into a str type.
- Lines 8-11: everything here uses concepts already covered above, so we won’t repeat them.
Line 7 is the place people get stuck most often in this program, so it’s worth a second look. Consider the code in the figure below:
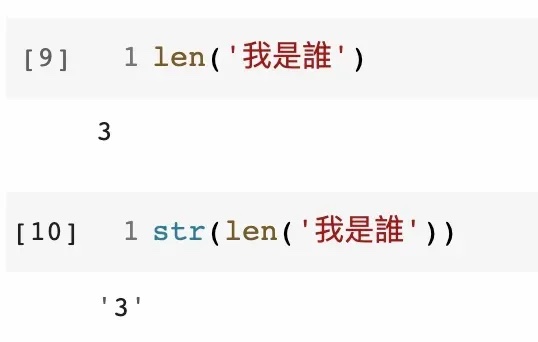
len( ) returns the length of the string passed to it, and the return type is an integer (int). What we need in the program is string concatenation, so we first have to convert the int 3 into the str ‘3’ before it can be joined to the other strings.
6 Type Conversion
Type conversion is very common in programming, because each type has its own capabilities. The str type supports string concatenation and replication; the int and float types support numeric arithmetic. When the type of the data you have doesn’t line up with the operation you want to perform, converting it is a necessary step.
As shown below:
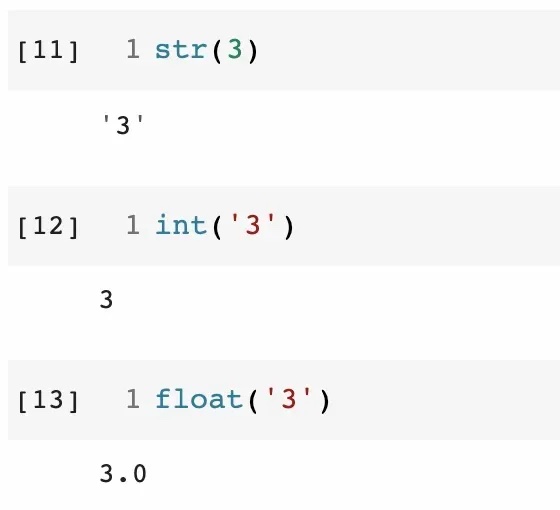
str( ) turns the integer 3 into the string ‘3’; int( ) turns the string ‘3’ into the integer 3; float( ) turns the string ‘3’ into the floating-point number 3.0.
7 Conclusion
In this article we wrote our first interactive Python program, using the variables and data types from the previous article, and picked up a new concept along the way: functions — print( ), input( ), len( ), plus the conversion functions str( ), int( ) and float( ). The full concept of a function is covered in depth in a later article.
The next article covers flow control in Python programs, starting with “Boolean Operators in Python”.