Google Colaboratory: Write Python With Zero Setup


1 Introduction
This is the first article in the Python programming beginner’s series. The place people most often get stuck when learning to program isn’t the syntax itself — it’s being killed by the environment before writing a single line: which Python version to install, pip throwing a pile of errors while installing packages, all the enthusiasm burned on setup.
Google Colaboratory (Colab from here on) neatly sidesteps that. It’s an environment where you write and run Python straight in the browser, with nothing to install. This article covers Colab through six questions: what it is, what its limits are, how to open one, how to run code, what parts of the interface you need to know, and which shortcuts a beginner should remember.
2 Question 1: What Is Google Colab?
Colab is a service from Google that lets anyone write and run Python code through a browser. The biggest benefit for a programming beginner is that it removes the hassle of setting up an environment — open a browser, sign in with a Google account, and you can start writing.
Underneath it’s a development environment based on Jupyter Notebook, and many commonly used packages (NumPy, pandas and the like) come preinstalled, which makes it a great fit for data science work. Colab also provides free compute (GPU), so we can speed up training machine learning models. (The free GPU allowance has tightened considerably in recent years compared to 2022, but it’s still plenty for practice.)
3 Question 2: Does Google Colab Have Any Limits?
Of course. A free service will always come with limits on the resources it supplies.
The first limit is hardware specification. The CPU and GPU Colab hands out for free won’t be the best of the batch, and your program may run slower than it would on your own machine — but for a beginner in data science it’s more than adequate.
The second limit is memory (RAM). If a model has too many parameters or the dataset is too large, you’ll hit an out-of-memory error. In practice, the response is usually to shrink the batch size or read only part of the data, rather than trying to force it through.
4 Question 3: How Do You Open Google Colab?
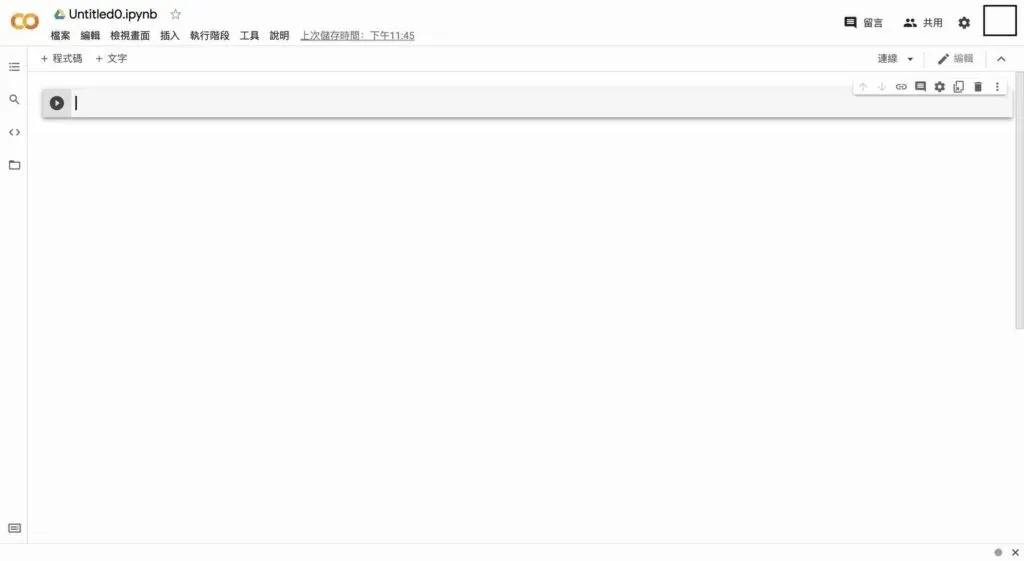
Once you have a basic understanding of Colab, you can start using it. Step one: go to your own Google Drive page. Then, right-click on an empty area of the screen, choose “More”, and click “Google Colaboratory”.

After clicking, you land on the Colab page! The file is saved directly in your Google Drive, so you can reopen it later by double-clicking it there.
5 Question 4: How Do You Run Python Code?
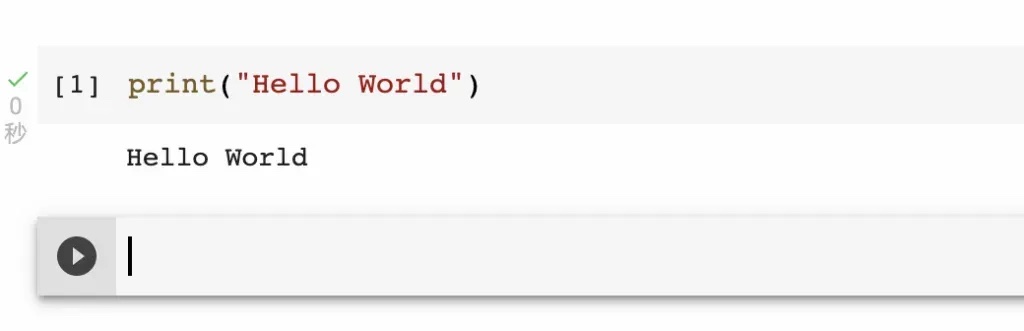
Every “box” in Colab is a Cell. We type code into a Cell and press Shift + Enter to run it, and Colab automatically adds a new Cell below once it finishes. In a freshly opened Colab environment, you have to wait for resources to be allocated before code will run.
6 Question 5: Which Parts of the Colab Interface Should You Know?
Colab doesn’t have many screen elements. Get familiar with the six areas below and you won’t get lost in any tutorial you read later.
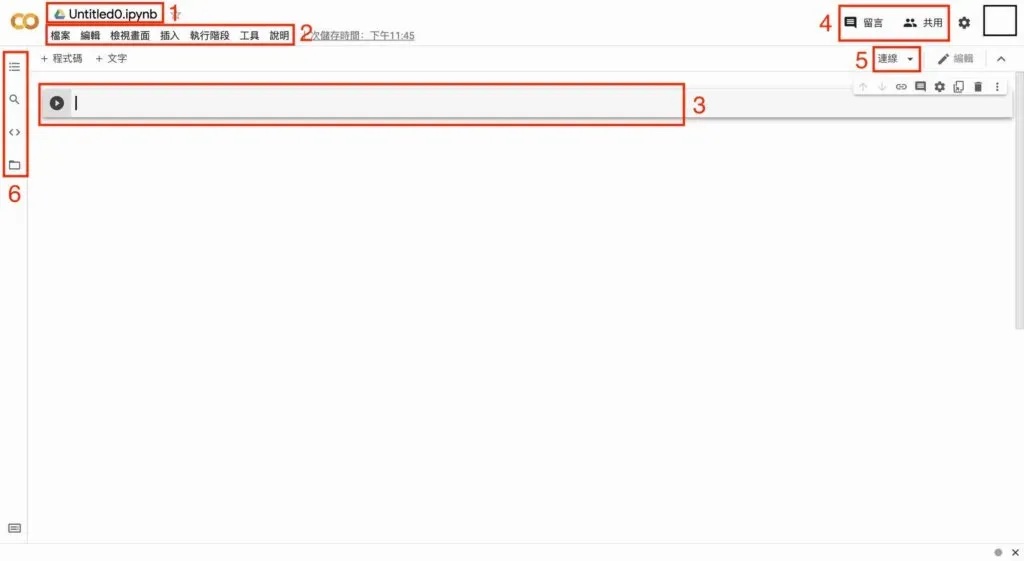
- File name: this area is where we name the Colab file. Because Colab is based on Jupyter, it takes the form of a Notebook, with the extension
.ipynb. (A plain Python file would have the extension.py.) - Toolbar: the toolbar area has a great many functions available; the ones you’ll use often are File, Edit, Insert and Runtime.
- File: “Locate in Drive” finds where this Colab lives in your Drive, and “Upload notebook” uploads a notebook into Colab from Drive, your computer or GitHub. “Download” saves this Colab as a
.pyor.ipynbfile. - Edit: you can “Undo delete cells”, “Delete selected cells”, or pick a hardware accelerator through “Notebook settings”. By default no hardware accelerator is used; when training a model you can switch to GPU here to speed things up.
- Insert: insert a “Code cell” or a “Text cell”.
- Runtime: decide which cells to run, restart the whole Colab environment with “Restart runtime” (Colab does hang sometimes), or choose whether to use a hardware accelerator with “Change runtime type”. Finally, “Manage sessions” shows which Colab files are currently running.
- File: “Locate in Drive” finds where this Colab lives in your Drive, and “Upload notebook” uploads a notebook into Colab from Drive, your computer or GitHub. “Download” saves this Colab as a
- Cell: Colab is like a Notebook, made up of one cell after another. A cell can hold either “code” or “text”: code cells are for Python code, text cells are written using Markdown syntax.
- Comment and share: one of Colab’s headline features is that you can share your Notebook with other people and let them edit the same Colab, collaborating much like Google Docs.
- Connection status: Colab runs on compute resources provided by Google, so to use it properly you need to be connected to that remote hardware. This area also shows current RAM and disk usage.
- Side toolbar: the side toolbar holds Colab’s more advanced features — from top to bottom: table of contents, find and replace, code snippets, and files.
- Table of contents: shows the structure of all the cells currently in the Colab. Since a Colab is made up of many cells, and cells can contain further cells beneath them, the table of contents makes the hierarchy between them clear.
- Find and replace: straightforward text find and replace.
- Code snippets: search here for commonly used snippets and copy them straight into your Colab. For example, to read a file from Google Drive inside Colab, search for “Google Mount” to find how to mount Google Drive into the Colab environment.
- Files: the Colab environment is like a virtual computer, and this area shows the root directory Colab is currently sitting in.
7 Question 6: What Are the Basic Colab Shortcuts?
Colab has a lot of shortcuts, and you can also configure your own under “Toolbar” > “Tools” > “Keyboard shortcuts”. A beginner doesn’t need to memorise all of them, though — getting comfortable with the handful you use most will noticeably speed up your work.
The two most basic operations switch a cell’s mode. Colab cells come in Code and Markdown modes: Code mode is for writing Python, Markdown mode for writing explanations or notes. If you aren’t comfortable with Markdown syntax, ignoring the syntax and just typing the explanation you want to leave behind works perfectly well.
- Turn a cell into a Code block: ⌘/Ctrl + m + y
- Turn a cell into a Markdown block: ⌘/Ctrl + m + m
Sometimes we need to delete a whole cell, or bring one back:
- Delete a cell: ⌘/Ctrl + m + d
- Undo a cell deletion: ⌘/Ctrl + m + z
Once the Python code is written in a cell, there are two ways to run it:
- Run this cell: ⌘/Ctrl + Enter
- Run this cell and add a new cell below: Shift + Enter
To move focus to a different cell without reaching for the mouse:
- Focus the previous cell: ⌘/Ctrl + p
- Focus the next cell: ⌘/Ctrl + n
As the code grows, finding a particular variable gets harder and harder — that’s when “Find and replace” in the side toolbar comes in:
- Find a piece of text: ⌘/Ctrl + h
And last but most important, don’t forget to save “manually” while editing (Colab does generally autosave new changes, but saving once by hand is reassuring):
- Save the Colab: ⌘/Ctrl + s
8 Conclusion
This article walked through the basic ideas behind Colab: what it is, where the limits of the free resources lie, how to open a new Notebook from Google Drive, how to run code in a Cell, and the interface and shortcuts. None of this needs to be memorised in one go — come back and look it up when you need something and can’t recall it.
Colab has plenty of more advanced operations (mounting Google Drive, switching to a GPU, installing extra packages, and so on) that will be covered in other articles. In the next article, we’ll formally start learning Python syntax.